Working with a Form
Working with Forms is fairly straightforward and in most cases you simply key data into a field. Some fields are interactive and respond as data is entered into them, date and attachment fields for instance:

Features of a Form:
|
Default values |
A field can include a default value, Accession Lot in the example above. A default value is typically provided by the Form's designer if the value is most often used in a field. Unless it has also been configured to be |
||||||
|
Date fields display a hint indicating the format of dates. When the cursor enters the field, the hint disappears and a calendar pops-up:
Either:
|
|||||||
|
An attachment field allows users to search for and link a record to the current record (the record being created / edited with the Form). Valued by is an attachment field linking to the Parties module. As characters are entered in an attachment field, matching records are dynamically listed. Select the record to attach:
|
|||||||
|
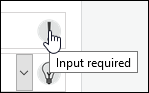
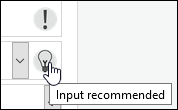
Optional, mandatory and recommended fields |
|
||||||
|
|
These buttons are disabled (grey) until data is entered in a field. An enabled button is coloured:
|
||||||
|
|
Collapse and expand sections. |
||||||


 and
and 

- Enter data and click
 to save the data and clear the Form ready for a new record.
When the Form is saved, it undergoes standard EMu validation (checking that numeric values are entered in fields configured as numeric, for instance; checking that mandatory fields have been completed). A record that fails validation will need to be corrected before it can be saved.
Feedback is provided indicating how one or more fields fails validation.
- When you have finished entering data, click:

Return to the Home screen.
If you belong to more than one project, the Home screen lists all the projects you belong to. If you belong to one project only, the Home screen lists the data entry Forms and any Editors you have access to.

Return to the list of Forms and Editors you have access to in the current project.
-OR-
Click
 to exit the application.
Note: It is possible to bookmark a Form in order to return directly to it rather than navigating through projects.

